Mice can get into a house through an opening about ¼ inch (6 mm) wide—roughly the width of a pencil. A useful mouse-proofing job therefore starts with a careful search for gaps, not a shopping trip for a single “mouse-proof” product. Work from the yard toward the house, inspect the exterior from foundation to roofline, then check the corresponding spots indoors. Seal openings with materials suited to each location and remove the food and shelter that encourage mice to stay. Source: CDC
If you already have mice indoors: Make the inspection and repairs, but also deal with any mice that remain inside. Sealing a route into the house does not remove the animals already there. The CDC recommends trapping where you see activity and keeping traps away from children and pets.

A quick mouse-proofing checklist
- Remove easy food sources and shelter near the house.
- Inspect the foundation, siding, exterior doors and garage-door edges.
- Check around pipes, cables and other utility lines.
- Look at attic, soffit and crawl-space openings without blocking needed ventilation.
- Inspect under sinks, behind appliances, and in the basement or attic for signs of activity.
- Repair gaps with a suitable, securely fitted material.
- If mice are already inside, trap remaining animals and clean contaminated areas safely.
- Recheck for fresh droppings, gnawing or reopened gaps.
Before you begin: look for openings and activity
Take a flashlight and make a note or photo of every suspect opening. The ¼-inch size is a reason to inspect small gaps, not a promise that every smaller crack is harmless: damaged or irregular edges may deserve repair too. Look for droppings, gnawed food packaging or building materials, shredded nesting material and stale smells. Finding those signs inside tells you where mice have traveled; it does not, by itself, identify their entry point outdoors. Sources: CDC · EPA
If you find droppings, do not sweep or vacuum them dry. Follow the CDC’s cleanup instructions: wear gloves, wet the material thoroughly with an appropriate disinfectant, allow the contact time specified on the label, then wipe it up. A heavily contaminated space needs additional precautions.
For a closer look at the inspection process, see how to find where mice are getting into your house.
Step 1: Make the yard less attractive to mice
Start where food and cover are easiest to remove. Keep garbage in containers with tight-fitting lids; clean up spilled seed or feed; put away pet food; and clear brush, weeds and debris next to the house. Deal with leaks or standing water you can safely address. These jobs do not replace exclusion, but they reduce the resources available to rodents while you work on the building. Sources: CDC · EPA
Pay particular attention to a garage or shed where food, seed or animal feed is stored. Keep those supplies in sturdy containers with tight lids, and inspect the outbuilding for openings as well as the main house.
Step 2: Inspect the exterior from the foundation up
Walk each side of the house slowly. Check places where two building materials meet, and inspect the entire edge of an opening rather than its center alone. The CDC’s exterior inspection list includes the foundation, doors, roof edges, vents and holes around utility lines.
| Location | What to look for | Next action |
|---|---|---|
| Foundation and lower siding | Cracks, broken material and gaps where the wall meets the foundation | Mark the gap; select a repair that suits the material and keeps water out |
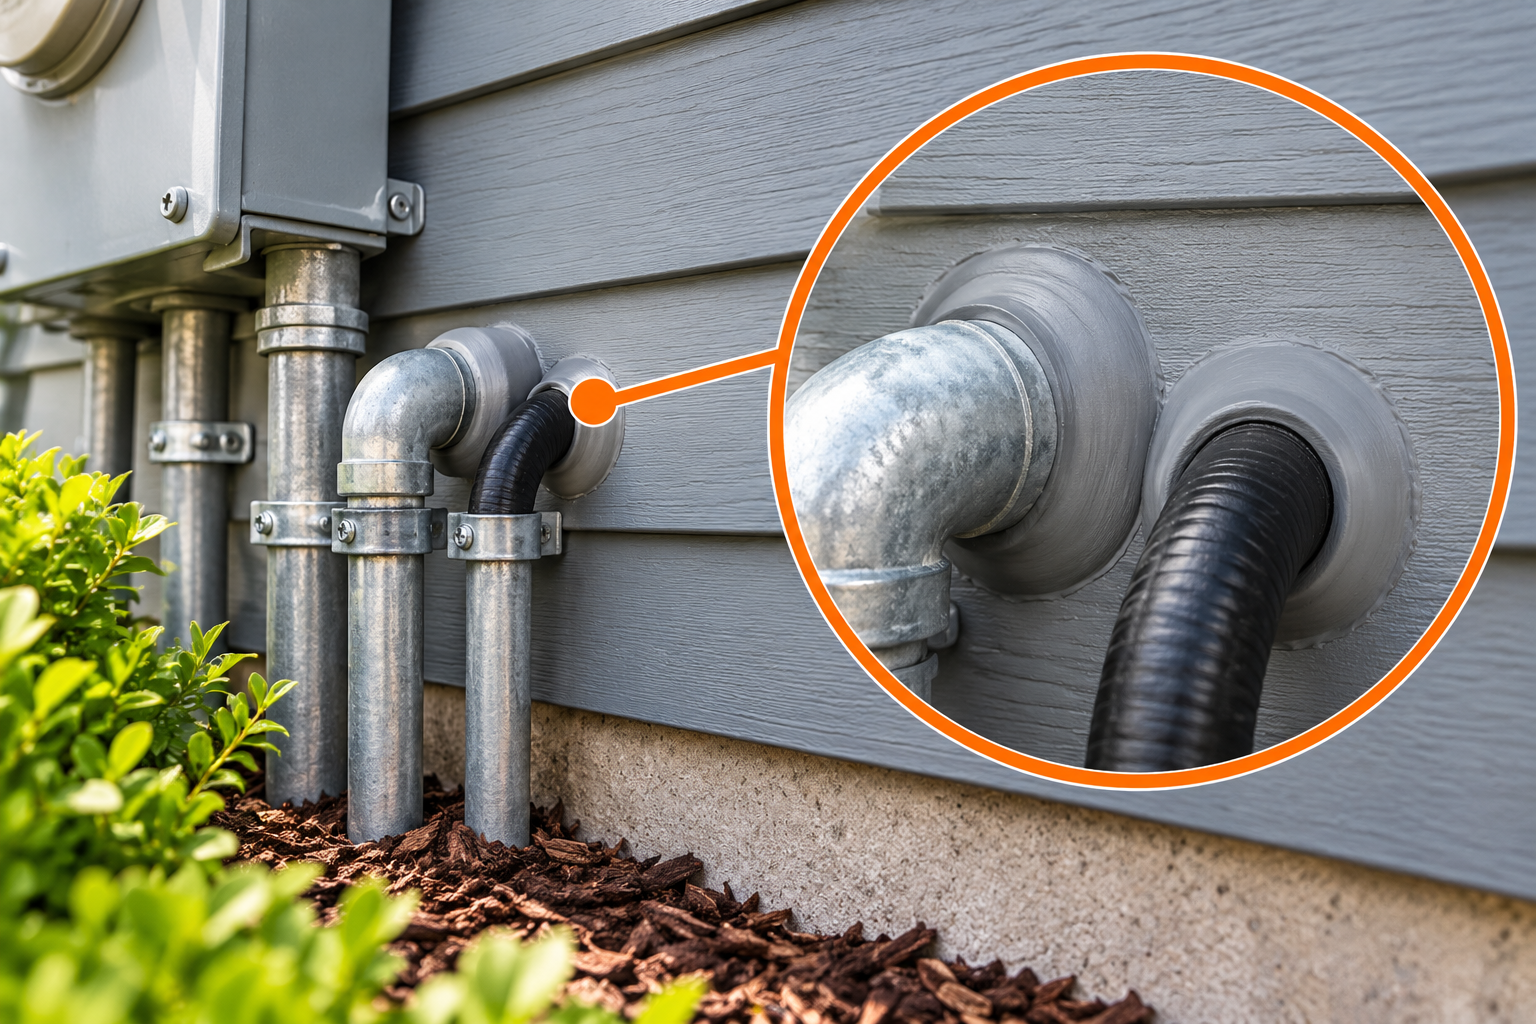
| Pipes, cables and AC lines | Space around the line where it passes through the wall | Seal around the line without damaging it or interfering with service access |
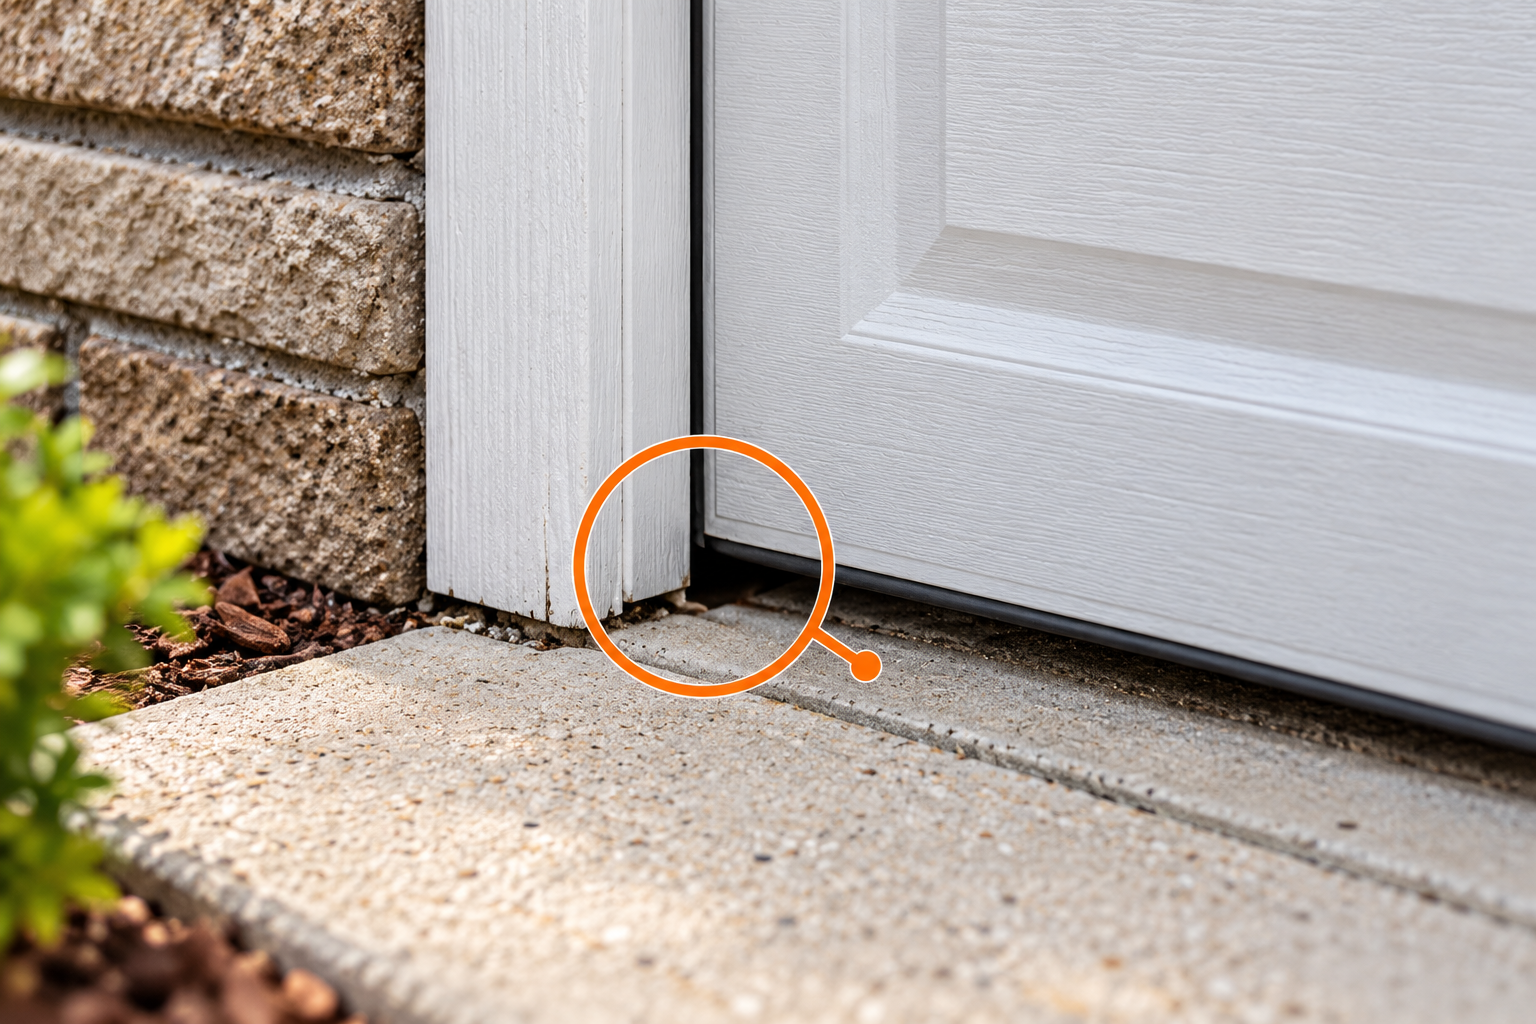
| Exterior and garage doors | Daylight under the door, worn sweeps and gaps at the bottom corners | Repair the fit or install a suitable sweep or seal |
| Crawl-space and attic vents | Missing, loose or damaged guards | Use a secure, suitable guard while preserving required airflow |
| Soffits, eaves and roof edges | Missing trim, damaged screens and openings into the attic | Record the location; arrange safe access and repair |
A closed garage door can still leave an opening at its lower corners, so inspect it from both sides. For roofline openings, inspect from the ground where possible. Do not climb onto a roof or disturb an occupied nest to complete a checklist.
Important vent exception: Do not put a mesh screen over a clothes-dryer exhaust termination. The 2024 International Residential Code prohibits screens at that termination. If its cover or damper is damaged, use a compatible repair that follows the manufacturer’s instructions and locally applicable requirements.
Step 3: Check the matching areas indoors
Once you have a list of possible exterior routes, look for corresponding gaps or signs indoors. The CDC recommends checking inside and behind kitchen cabinets, under sinks, behind appliances, around utility lines, and in basements, crawl spaces and attics.
For example, droppings under a sink and an unsealed pipe opening behind the cabinet warrant a closer look—but check where those pipes pass through the building exterior as well. Covering only the cabinet opening may leave the route into the house intact. Keep your notes from both sides so you can distinguish a suspected entry point from an interior travel path.
Step 4: Repair openings with materials suited to the gap
There is no single filler for every opening. The goal is a durable barrier that fits securely and does not interfere with the building’s ventilation, drainage or equipment.
| Opening | General approach |
|---|---|
| Small, accessible hole | The CDC recommends steel wool held in place with caulk; choose a repair suitable for the location and exposure |
| Larger hole or damaged section | Use an appropriately fitted metal barrier, hardware cloth, sheet metal, cement or other suitable patch |
| Gap around a utility penetration | Fit the barrier around the line and finish the seal without damaging the pipe or cable |
| Door-bottom gap | Restore the door’s fit and use a tight-fitting sweep or seal suitable for that door |
| Vent opening | Repair or replace its guard without obstructing the airflow the vent requires |
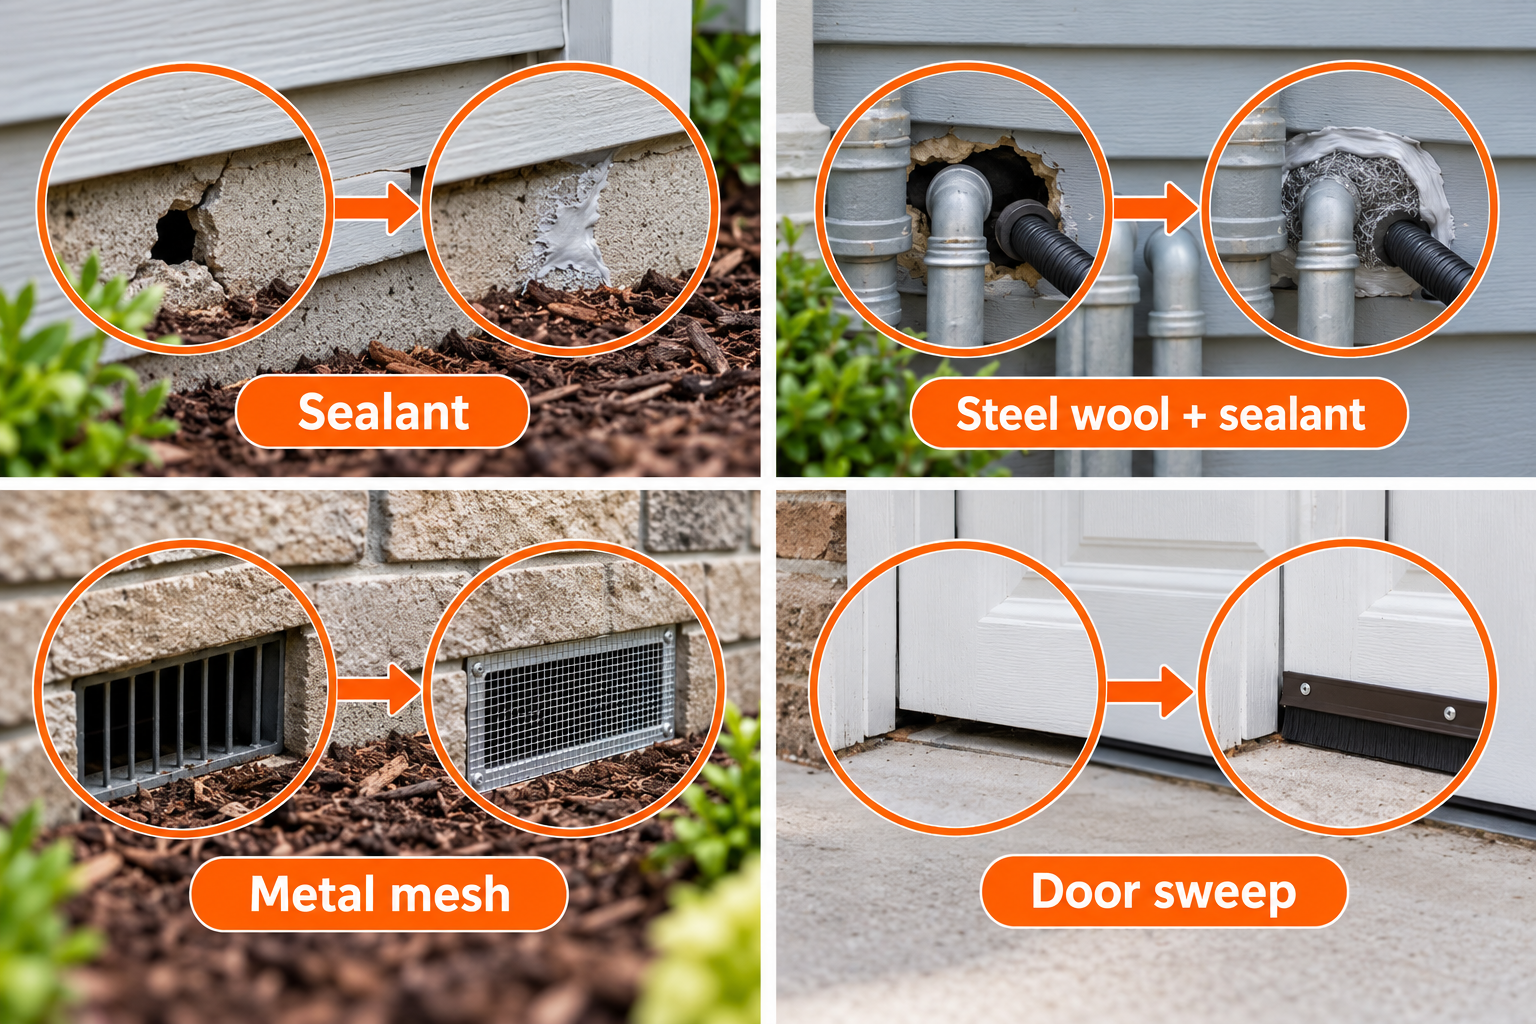
CDC guidance lists steel wool for small holes and metal, hardware cloth or cement for larger repairs. The EPA notes that rodents can chew through spray foam, so do not rely on exposed foam alone as the barrier. For ordinary vent openings, the US Department of Energy discusses securely attached, durable metal screening, while also warning that screen size can affect airflow. Dryer exhausts need the separate treatment described above.
Avoid altering electrical or gas components. Have a qualified tradesperson deal with a repair that requires moving a line, opening equipment or working on a system you cannot identify.
Step 5: If mice are already inside, address them too
Exclusion prevents new entry, but it is only part of the job when activity is underway. The CDC advises placing traps where mice have been seen or where signs appear, such as behind appliances and along walls. It recommends traditional snap traps and says traps and bait must be kept out of reach of children and pets. Check traps regularly and continue to watch for new signs after the repairs.
Clean droppings, urine, nests and dead rodents according to the CDC’s cleanup guidance. In particular, wet contaminated material with disinfectant before removing it; do not dry-sweep or vacuum it. If rodents have reached inaccessible spaces, an HVAC system, or an area with substantial contamination, seek professional help rather than disturbing the material yourself. Sources: CDC sealing · CDC cleanup
Step 6: Check the results
Revisit the places you photographed or marked. Look for new droppings after safe cleanup, renewed gnawing, damaged seals and gaps you may have missed. A quiet day is encouraging, but it is not proof that every entry route has been closed. If activity continues, repeat the exterior-to-interior inspection and consider a rodent-control professional. The EPA offers guidance on hiring one.
Mouse proofing is most manageable as a repeatable route through the property: reduce attractants, find the openings, repair them correctly, deal with mice already indoors, and check again. Keep the inspection notes so a future gap is easier to spot.
References
- CDC — How to Seal Up to Prevent Rodents
- CDC — How to Trap Up to Remove Rodents
- CDC — How to Clean Up After Rodents
- EPA — Identify and Prevent Rodent Infestations
- EPA Indoor airPLUS — Pest Entry Prevention
- US DOE Building America — Screens and Other Deterrents
- 2024 International Residential Code — Chapter 15, dryer exhaust termination